Direct Connect:
Prior to operation the M.O.L.E. thermal profiler must be configured to properly communicate with the M.O.L.E.® MAP Software.
|
The M.O.L.E.® MAP software must be installed prior to communications setup. (Refer to Software Installation for more information). |
.png "Important Information")
To connect the M.O.L.E. Profiler:
| 1) | Insert the USB computer interface cable into a computer USB Port and the USB-C end into the Data/Charging Port. |

|
On operating systems Windows 10 and higher, the device driver automatically installs. for Windows 7 the driver needs to be manually installed with the files located the folder DriverEV of the installation flash drive. Refer to topic Communication Problems for more information. |
| 2) | After M.O.L.E. thermal profiler is connected to a computer, the software must be configured so they can communicate. Start the software program by either double-clicking the M.O.L.E.® MAP software icon or selecting it from the ECD program sub-menu. |

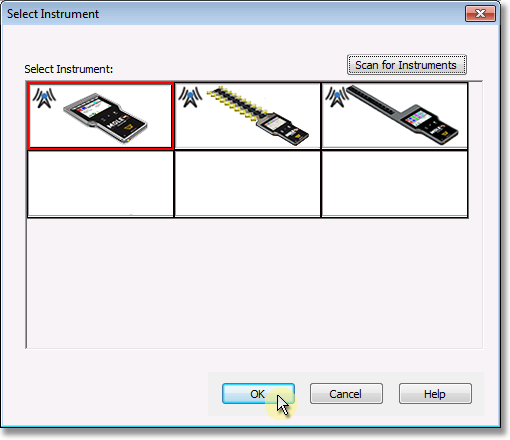
| 3) | On the M.O.L.E. menu, click the Select Instrument command. |
| 4) | Select the desired instrument from the dialog box. If there are none displayed, click the Scan for Instruments command button to detect all available instruments. |

|
If the software does not detect a M.O.L.E. thermal profiler, using the communication cable connect it to the computer and click the Scan for Instruments command button to search again. M.O.L.E.® MAP software allows multiple instruments to be connected to a computer at one time. Selecting the Scan for Instruments command button will detect all instruments and display them in the dialog box. If no instrument is detected the software displays all of the Demonstration thermal profilers to select from. |
| 5) | Click the OK command button to accept or Cancel to quit the command. |
Wireless Option Setup
To connect the wireless option:
|
Prior to wireless communication, the M.O.L.E. Profiler must first be connected to a computer through the USB Port. This allows the software to register the serial number of the M.O.L.E. Profiler. Registering the serial number ensures that other M.O.L.E. RF transmissions in close proximity to each other will not interfere preventing others from controlling your M.O.L.E. Profiler without your consent. |
| 1) | Insert the USB computer interface cable into a computer USB port |
| 2) | Insert the USB-C end into the M.O.L.E. thermal profiler data/power port. |
|
The first time the transceiver illuminates solid Yellow. |
|
The M.O.L.E. Profiler is designed to work with the included antenna ECD P/N: E63-3800-11 only. Never make any changes or modifications to the Wireless components. Such changes are not expressly approved by ECD and could void the user's authority to operate the equipment. |
.png "Caution")
.png)
| 3) | Turn ON the M.O.L.E. thermal profiler by pressing the ON/OFF button. |
| 4) | From the Home Screen, press the Main Menu button. |
.png)
| 5) | Press the Bluetooth® button. |
.png)
| 6) | Press the Bluetooth® ON/OFF button to make the M.O.L.E. thermal profiler available for a wireless connection. |
.png)
| 7) | Press the OK button to save the setting. |
.png)
| 8) | When the LED is solid Yellow, press and hold the pair button for 3 seconds and the LED then flashes Yellow. |
.png)
|
Once a communication connection is established, the LED illuminates solid Blue and the Bluetooth® screen displays the status and connection strength.
|
.png "Caution")
.png)
| 9) | Confirm the M.O.L.E. thermal profiler and Transceiver connection is still active indicated by the LED illuminated solid blue. |
| 10) | Start M.O.L.E. MAP. |
| 11) | On the M.O.L.E. menu, click the Select Instrument command. |
| 12) | Select the desired instrument from the dialog box. If there are none displayed, click the Scan for Instruments command button to detect all available instruments. |
| 13) | Click the OK command button to accept. |
The system is now ready to start Wireless RF communication. Refer to topic: Wireless RF Communications to start the real-time wireless data collection.
Wireless communication tips:
Wireless signals come and go as either the M.O.L.E. thermal profiler moves through the oven or the Transceiver is moved around like FM radio static as you drive in your car. Moving a few inches in any direction can turn a low signal strength to high signal strength. This gets worse as the Transceiver gets further from the M.O.L.E. to a point where no position works.
When setting up the Wireless system, the transceiver should be placed as close to the machine as practical. A standard USB extension cable can be used to move the Transceiver closer to the machine or up and away from metal or other interference objects.
Typically if the Transceiver is 3 meters [10 feet] away from the M.O.L.E. in a machine any location in the room, reception should be fine. Reception is also often a bit better when the Transceiver is perpendicular to the direction of travel through the machine. Metal objects such as carts, walls, or other equipment in the room will impede transmission.
The transmitting Antenna and its proximity to metal can have a big affect. Care should be taken to make sure the Antenna is not laying on metal parts in the machine or barrier box. Keeping the Antenna straight is best.
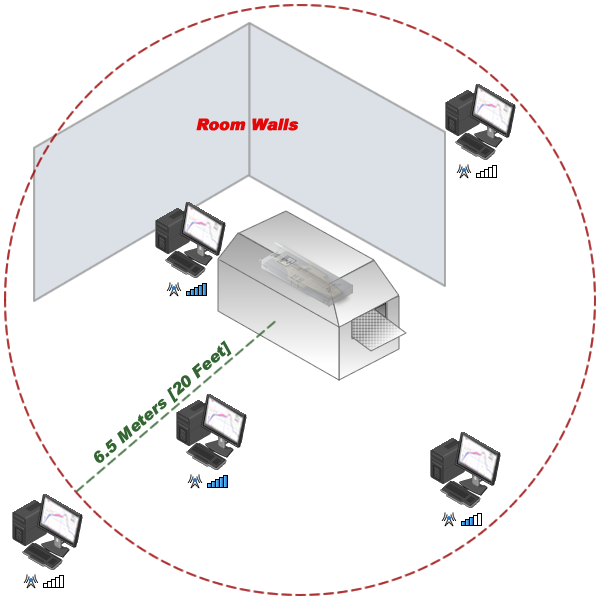
Wireless Range